When designing a die-cast perfume cap, you might specify fine concentric rings on the top, a diamond-pattern band around the side, or a delicate matte texture across the whole cap. These textures change its appearance, but they are created in different ways.
Texture-forming methods for die-cast Perfume Caps fall into six groups: cast-in texturing, laser engraving, turning and milling, knurling, brushing, and abrasive or bead blasting. Some textures form during casting, others are machined into the blank, and some appear through localized changes to a surface coating. Wbmetal manufactures zinc alloy die-cast perfume caps. Looking at the process from the cast blank through secondary machining to the coated or electroplated cap helps identify when a texture forms and whether that operation changes the metal or its surface coating.
Distinguish the Texture Pattern from the Process
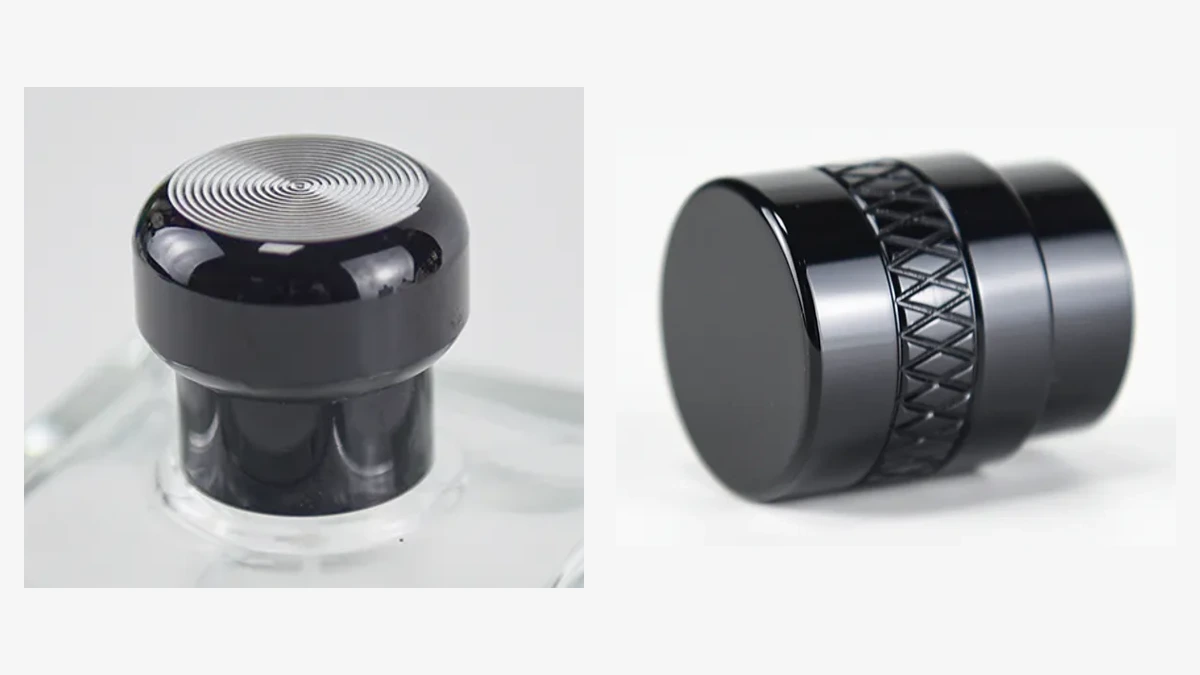
Wbmetal’s mushroom-top perfume cap with a CD pattern has closely spaced rings on its top and a smooth sidewall. Its triangular-texture cap concentrates geometric relief in a band around the sidewall. These two designs show how a texture can be the visual focus of an entire surface or decorate just one area.
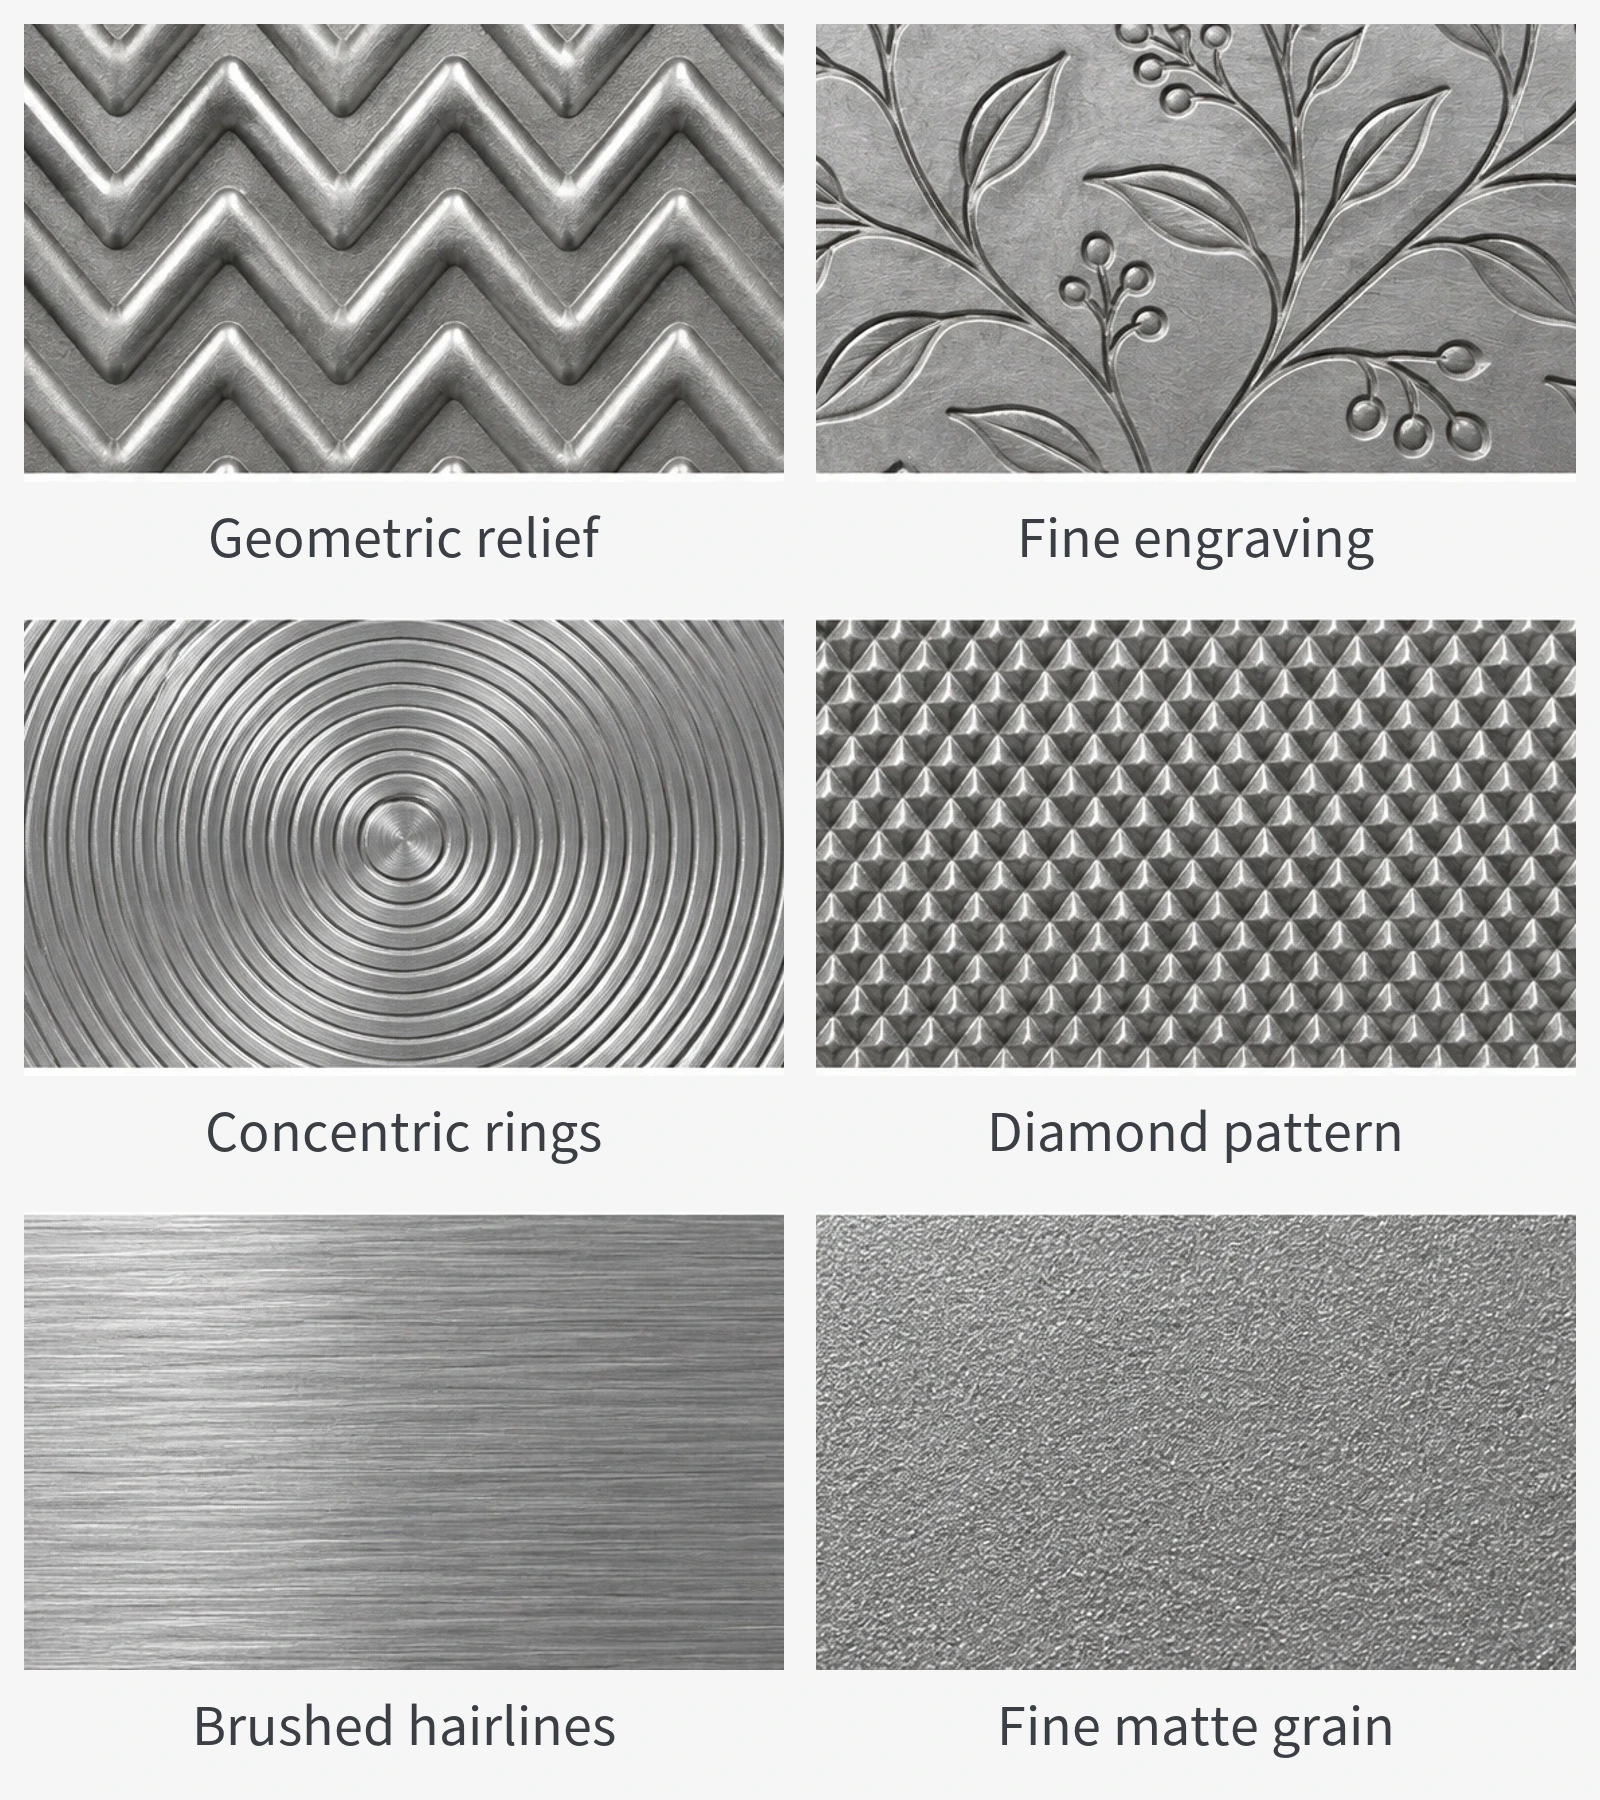
Names such as “CD pattern,” “diamond pattern,” and “brushed finish” describe what you see. They do not identify a single manufacturing process: a diamond pattern can be formed in the die or created after casting, and a simulated brushed texture can also be replicated during casting. Recognizing the appearance is only the first step; the actual texture-forming operation still needs to be identified.
| Method | How the Texture Forms | Possible Textures |
|---|---|---|
| Cast-in texturing | The casting replicates the inverse shape of the die cavity | Raised and recessed patterns, relief, raised or recessed lettering, and simulated brushed textures |
| Laser engraving | Metal or a surface coating is removed locally | Fine lines, patterns, lettering, recessed engraving, or color contrast |
| Turning and milling | A cutting tool removes material | CD patterns, ring grooves, straight grooves, and curved grooves |
| Knurling | A patterned wheel forms or cuts the surface | Straight, diagonal, and crossed diamond patterns |
| Brushing | Abrasives produce scratches in a defined direction | Directional hairlines and satin finishes |
| Abrasive and bead blasting | Particles strike the surface | Uniform matte and granular textures |
Cast-In Texturing: Forming the Pattern During Casting
Building the texture into the die allows the cast blank to emerge with its pattern already formed. Recesses in the die cavity can produce raised features on the casting, while projections in the cavity leave recessed areas. Once the zinc alloy fills the cavity and solidifies, the cap carries this inverse shape.
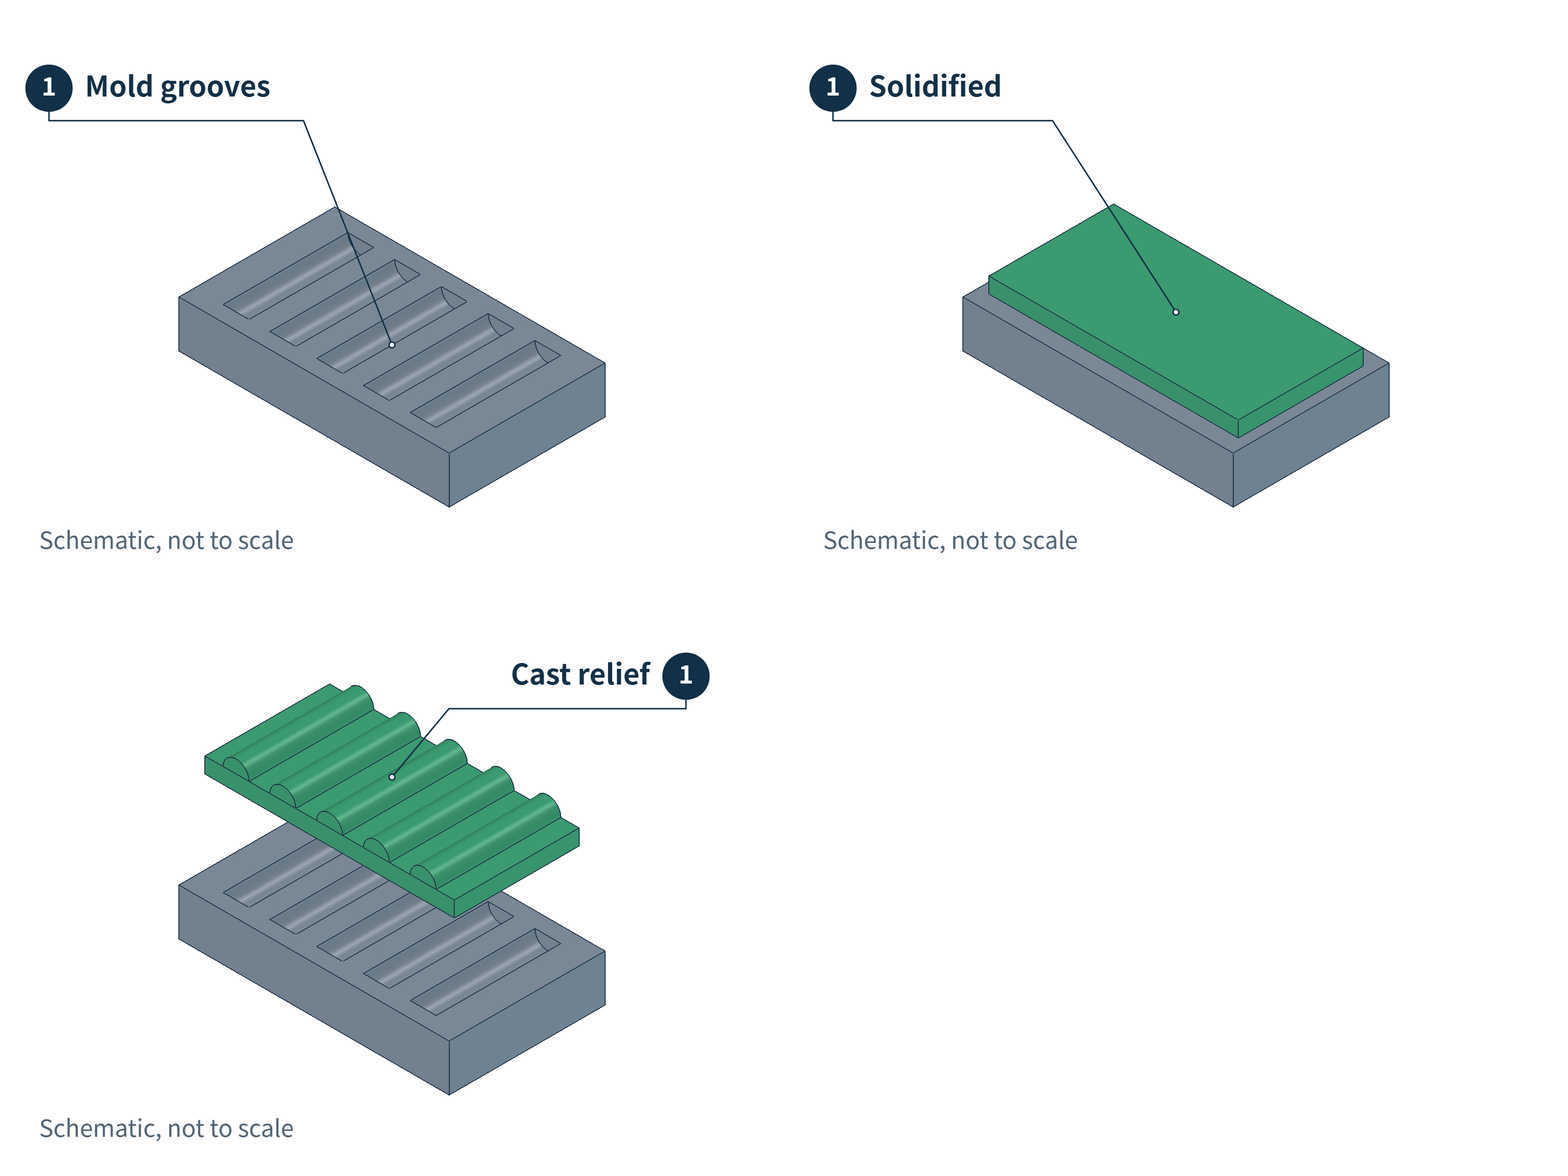
Regular grooves, geometric relief, sculpted details, and lettering can all be assessed for cast-in production according to their shape. International Zinc Association design guidance describes high-speed milling and electrical discharge machining (EDM) for producing lettering in the die; lasers can also engrave die inserts. Engraving a die insert and then replicating its pattern during casting is a different production route from laser engraving each cap afterward.
Cast-in textures can also imitate the appearance of other processes. In a zinc die-casting case published by the International Zinc Association, a simulated brushed texture was created in the die, and its directional pattern remained visible after the casting was coated. A brushed appearance therefore does not establish that a cap was mechanically brushed.
The texture must be designed together with the demolding arrangement. If raised or recessed features obstruct removal from the die, the pattern needs to be adjusted or suitable die mechanisms provided. Fine, sharp projections in the die also need checks for strength and wear. A finished-product illustration alone is not a basis for making patterns progressively deeper or finer.
Laser Engraving: Cutting into Metal or Removing a Coating
A laser can process selected areas according to a programmed pattern, making it suitable for lettering, logos, and fine-line decoration. However, “laser engraving” needs to be understood in terms of the layer being processed.
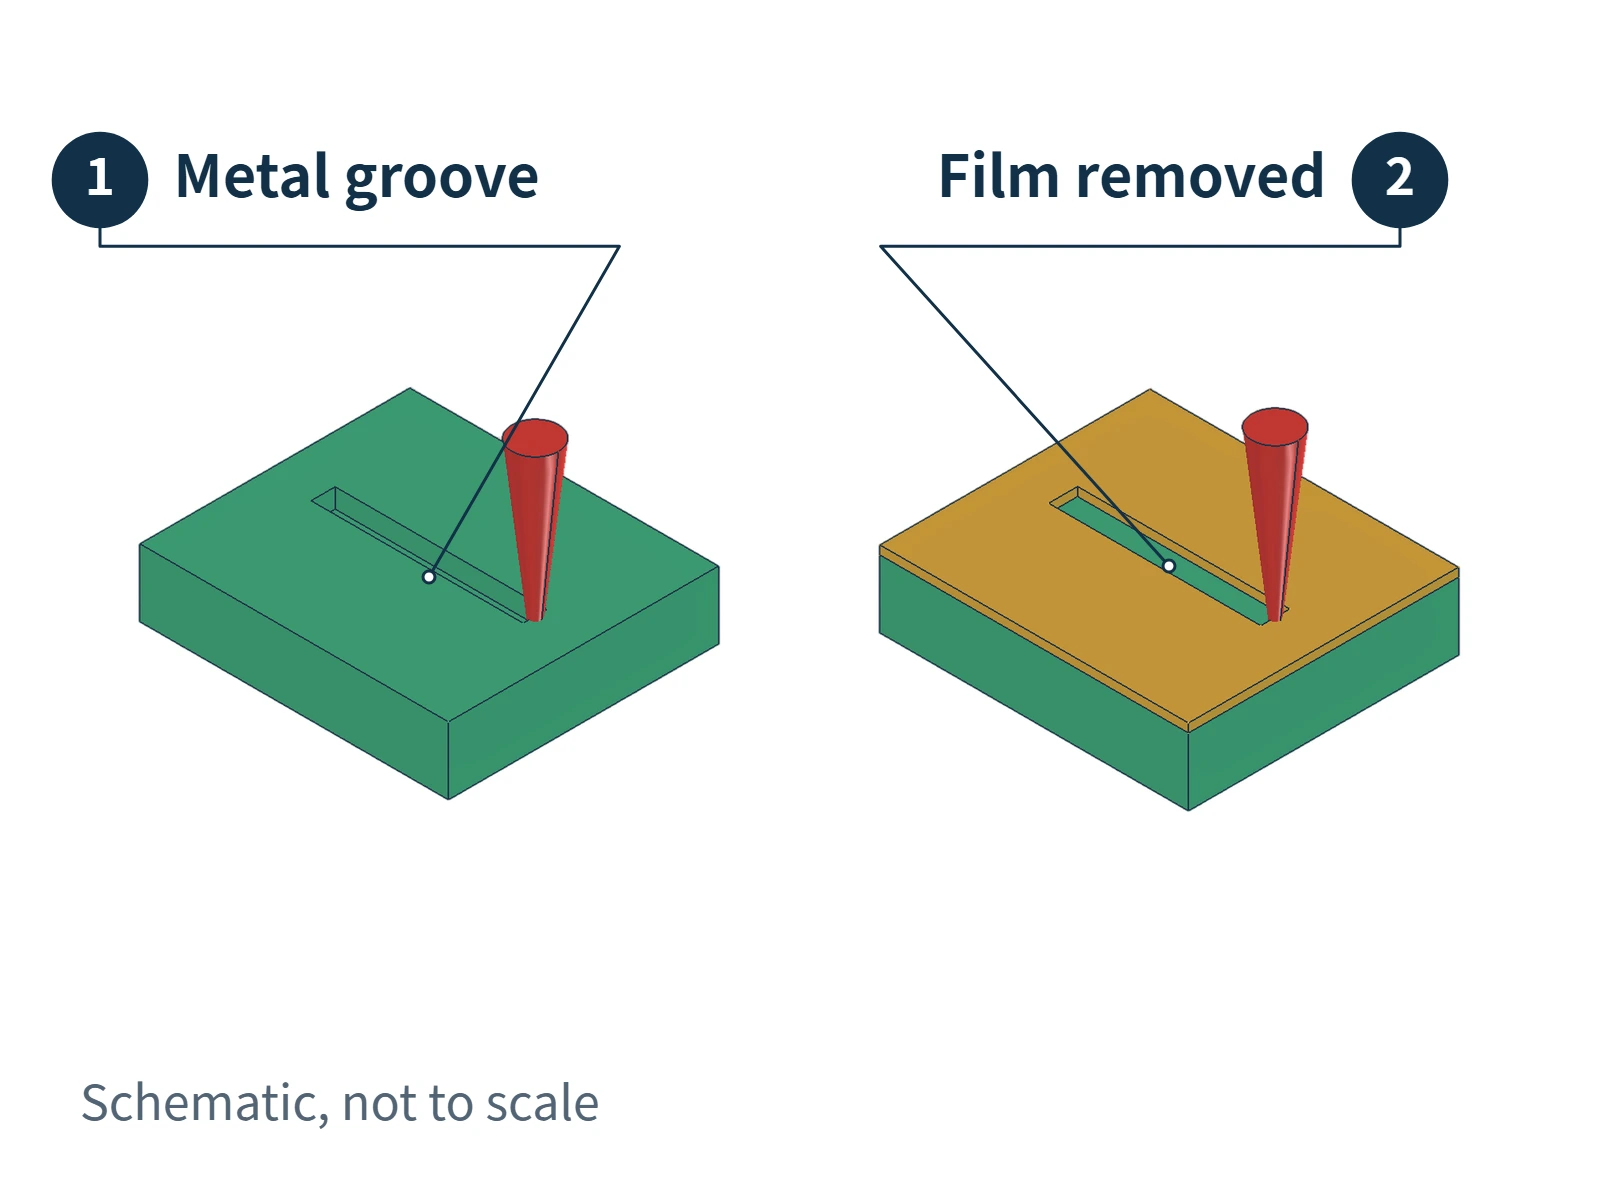
The method on the left removes the metal itself to create a recessed engraving. A deeper recess requires more material removal and usually more processing time. Technical guidance on deep laser engraving considers depth, appearance requirements, and processing time together. The production speed of ordinary surface marking cannot simply be assumed for deep relief engraving.
The method on the right removes a surface coating, such as paint, to expose the material underneath. The color difference between the layers produces the pattern. This can create a clearly visible result without a pronounced groove in the metal. Laser equipment technical guidance also distinguishes material engraving from coating removal.
On a die-cast perfume cap, the laser result depends on the alloy, the existing surface layers, and the processing goal. Whether you want a clearly visible graphic or a recess you can feel determines what to check during sampling: color contrast or engraving depth and edge quality. The term “laser engraving” alone does not specify these two different requirements.
Turning and Milling: Cutting Grooves with Tools
In turning, the workpiece rotates while a cutting tool removes material. A round perfume cap can have ring-shaped grooves machined into its face or circumferential grooves and decorative steps on its sidewall. Fine turning marks on the face can create a compact-disc-like appearance, commonly called a CD pattern.
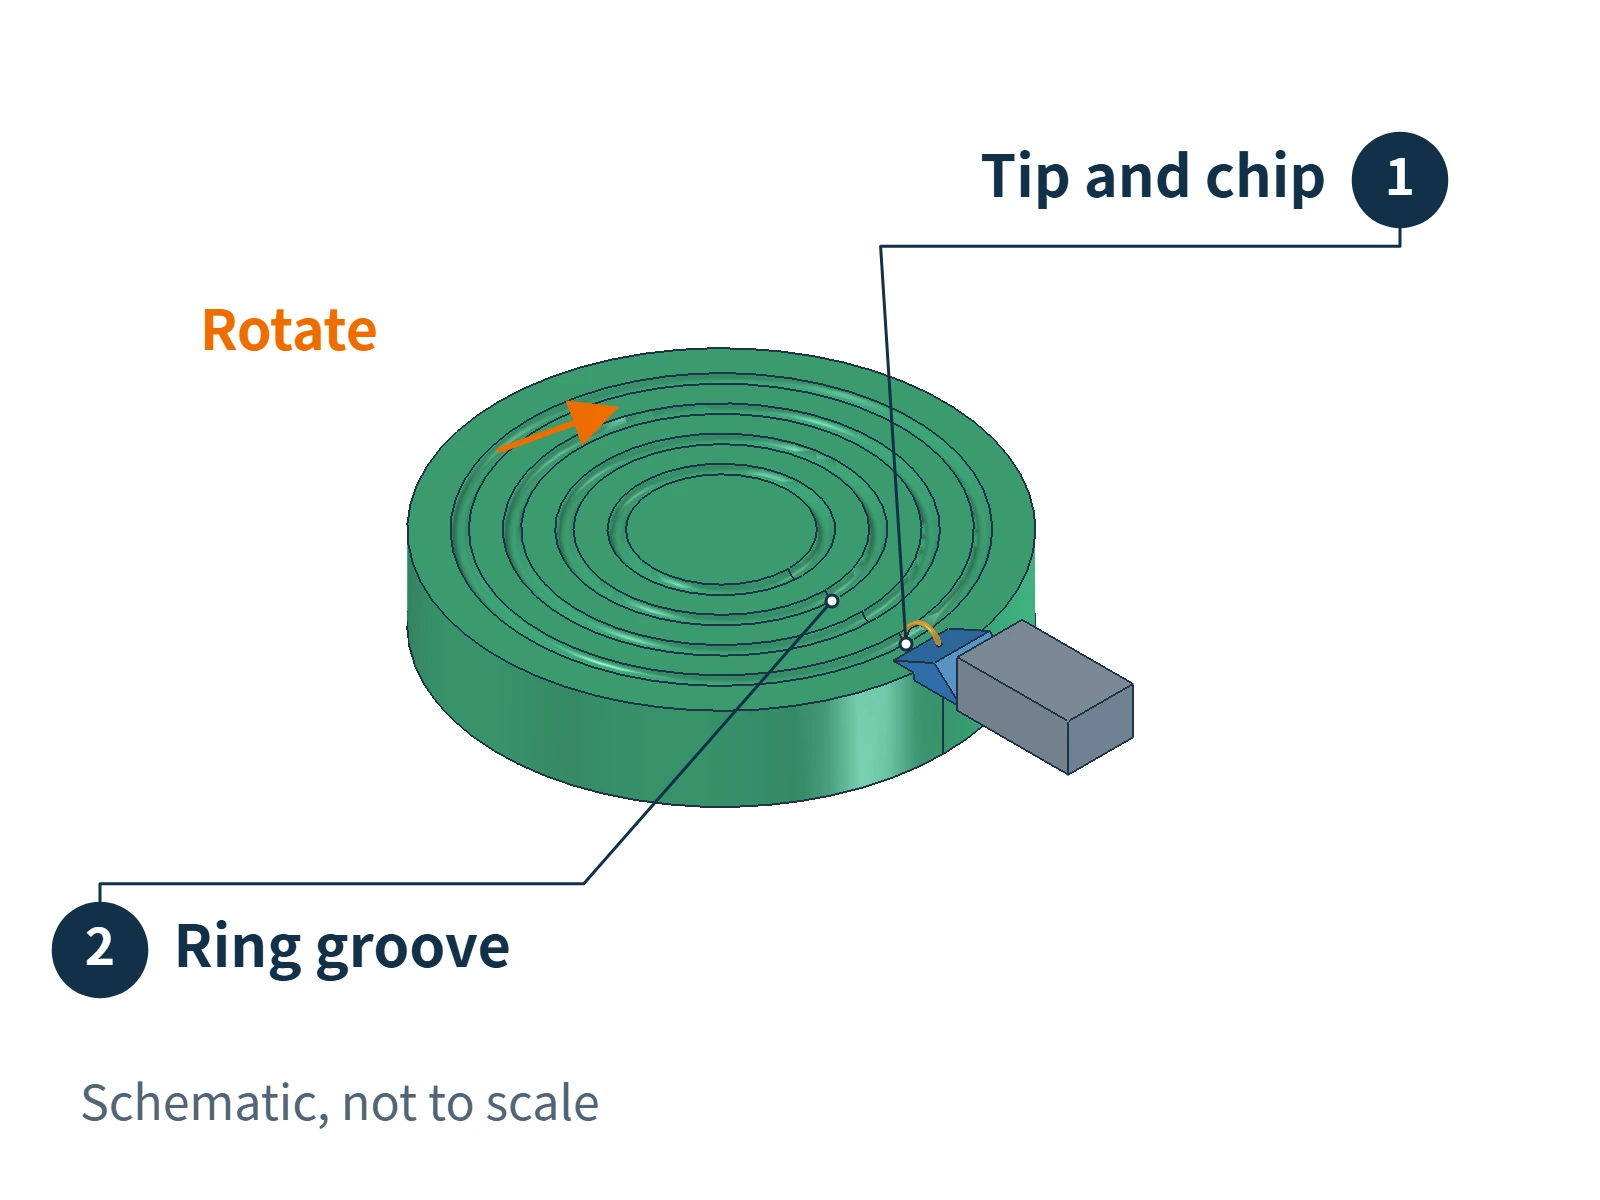
Consistent fine rings require control of the tool, feed, and surface machining conditions. Feed is the distance the cutting tool advances for each revolution of the workpiece. Wbmetal’s CD-pattern cap illustrates the appearance; whether a particular design uses cast-in replication, secondary turning, or a combination should be confirmed from its process records.
Milling uses a rotating cutter that follows a defined path. Beyond simple ring grooves, it can produce straight grooves, curved grooves, and other shapes that allow tool access. Tool manufacturers’ slot-milling guidance covers closed slots, curved slots, and slots at different angles.
Machining textures into a cast blank also requires enough machining allowance: material reserved for the tool to remove. Removing too much can expose porosity beneath the surface skin and affect appearance. International Zinc Association design rules therefore advise avoiding excessive material removal during machining. Groove depth should be determined together with blank quality and the remaining wall thickness.
Knurling: Producing Repeating Patterns with a Patterned Wheel
Knurling uses a toothed tool to produce a repeating pattern on a rotating workpiece. Common results include straight, diagonal, and crossed diamond patterns.
There are two basic methods. Form knurling applies pressure to deform the surface material into a pattern. Cut knurling removes material to cut the pattern. Knurling-tool technical guidance clearly distinguishes these mechanisms.
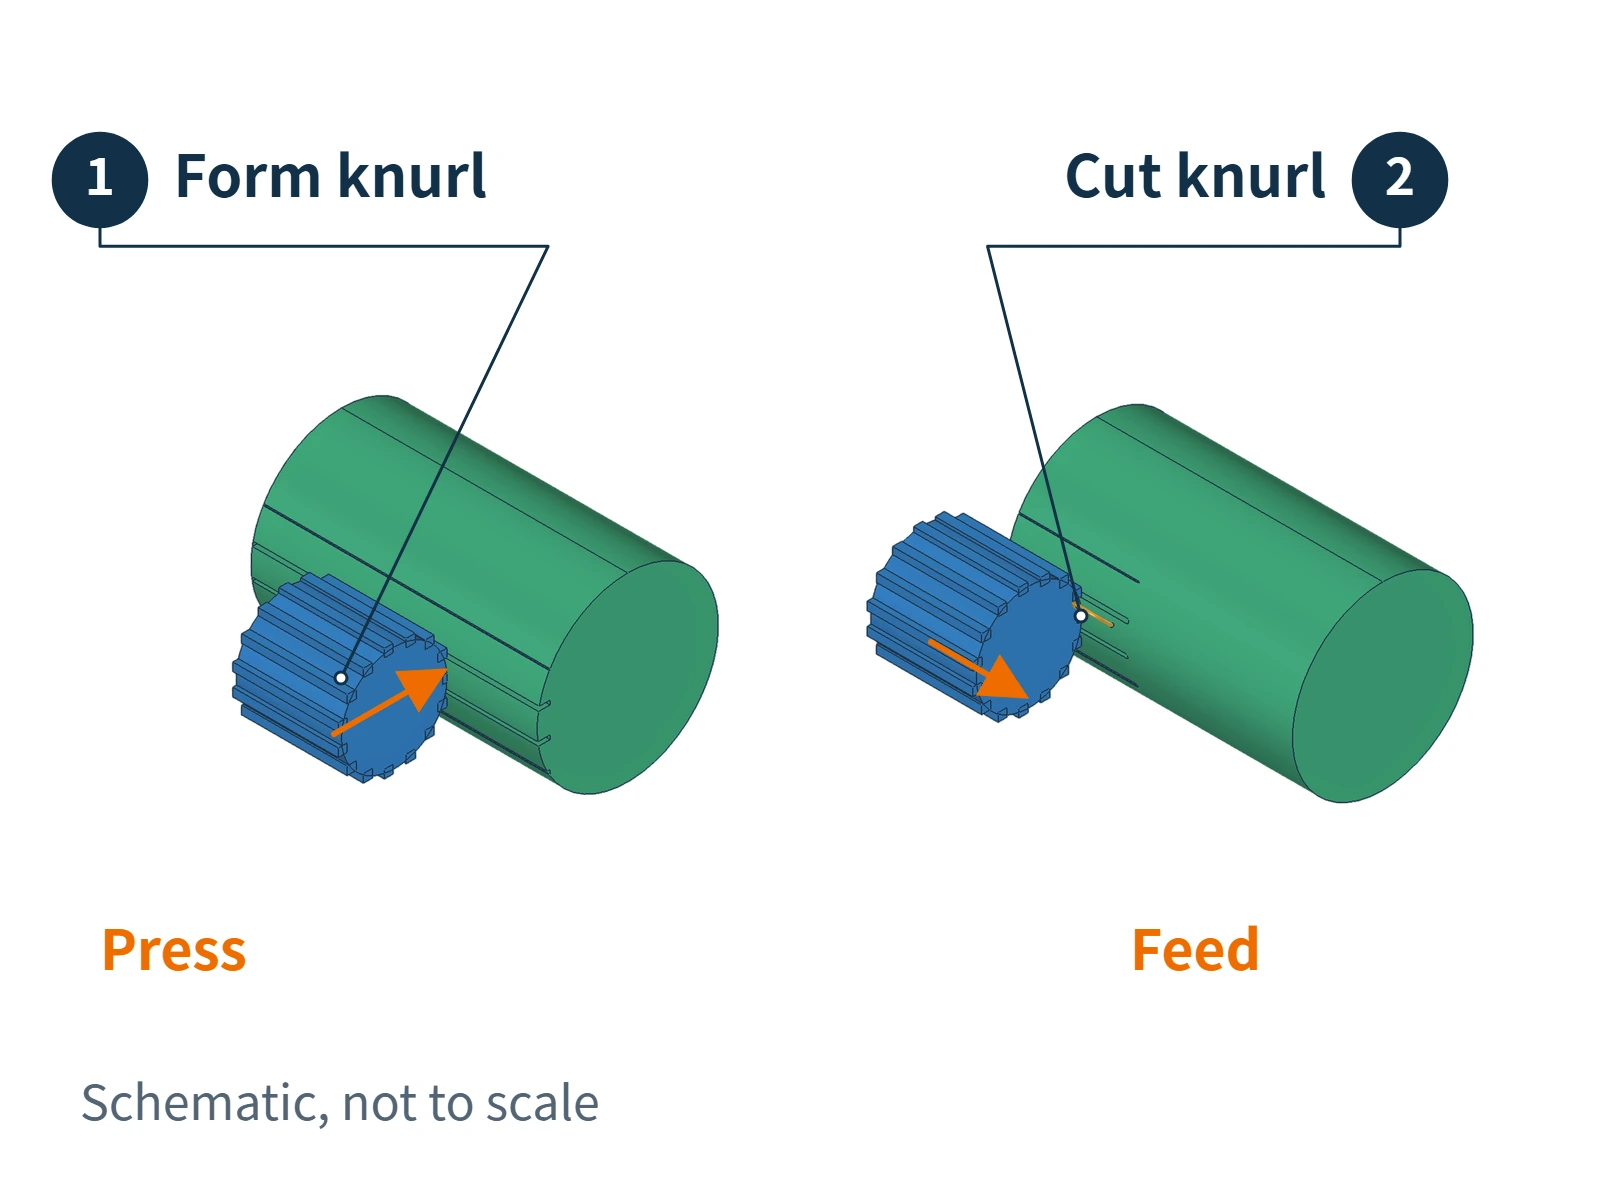
Even when knurling is performed on a lathe, it should not be confused with ordinary turning. A turning tool cuts grooves along its toolpath, while a knurling tool uses its own tooth geometry to generate a repeating pattern.
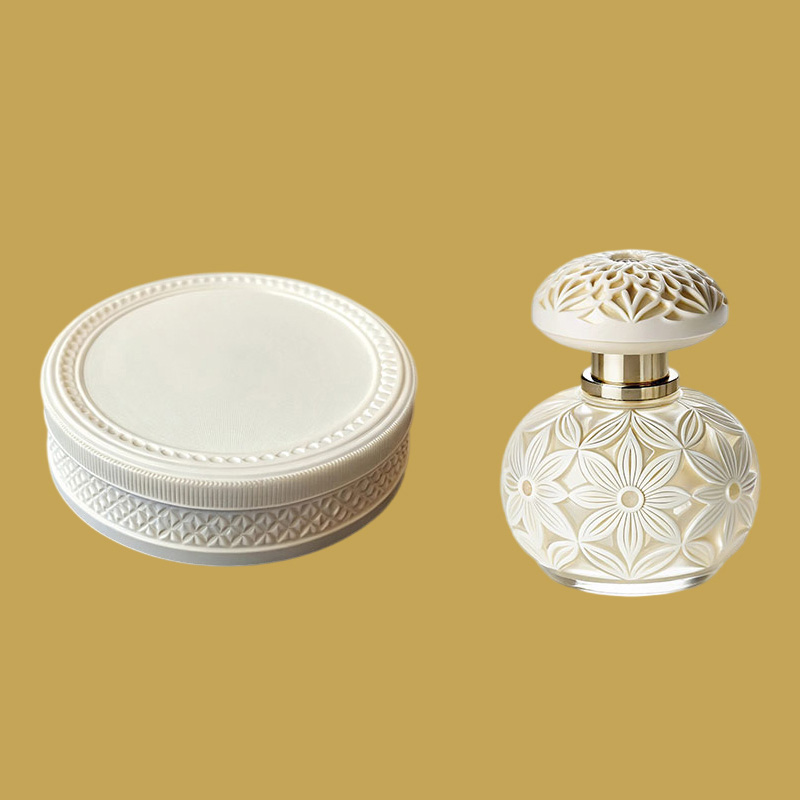
Whether secondary knurling is suitable for a zinc alloy die-cast cap depends on the alloy condition, casting quality, wall thickness, and clamping support. Form knurling particularly requires assessment of deformation under pressure. For a cap with diamond-shaped or triangular relief, cast-in texturing should also be considered. The appearance alone does not establish that the cap was knurled after casting.
Brushing: Producing Fine Directional Lines
Brushing uses abrasives, such as belts or abrasive brush wheels, to work the surface in a defined direction and leave fine scratches. Their direction and spacing create the main visual effect, often giving the surface a soft satin appearance. Metal-finishing technical guidance describes abrasive wheels and belts as ways to produce directional textures.
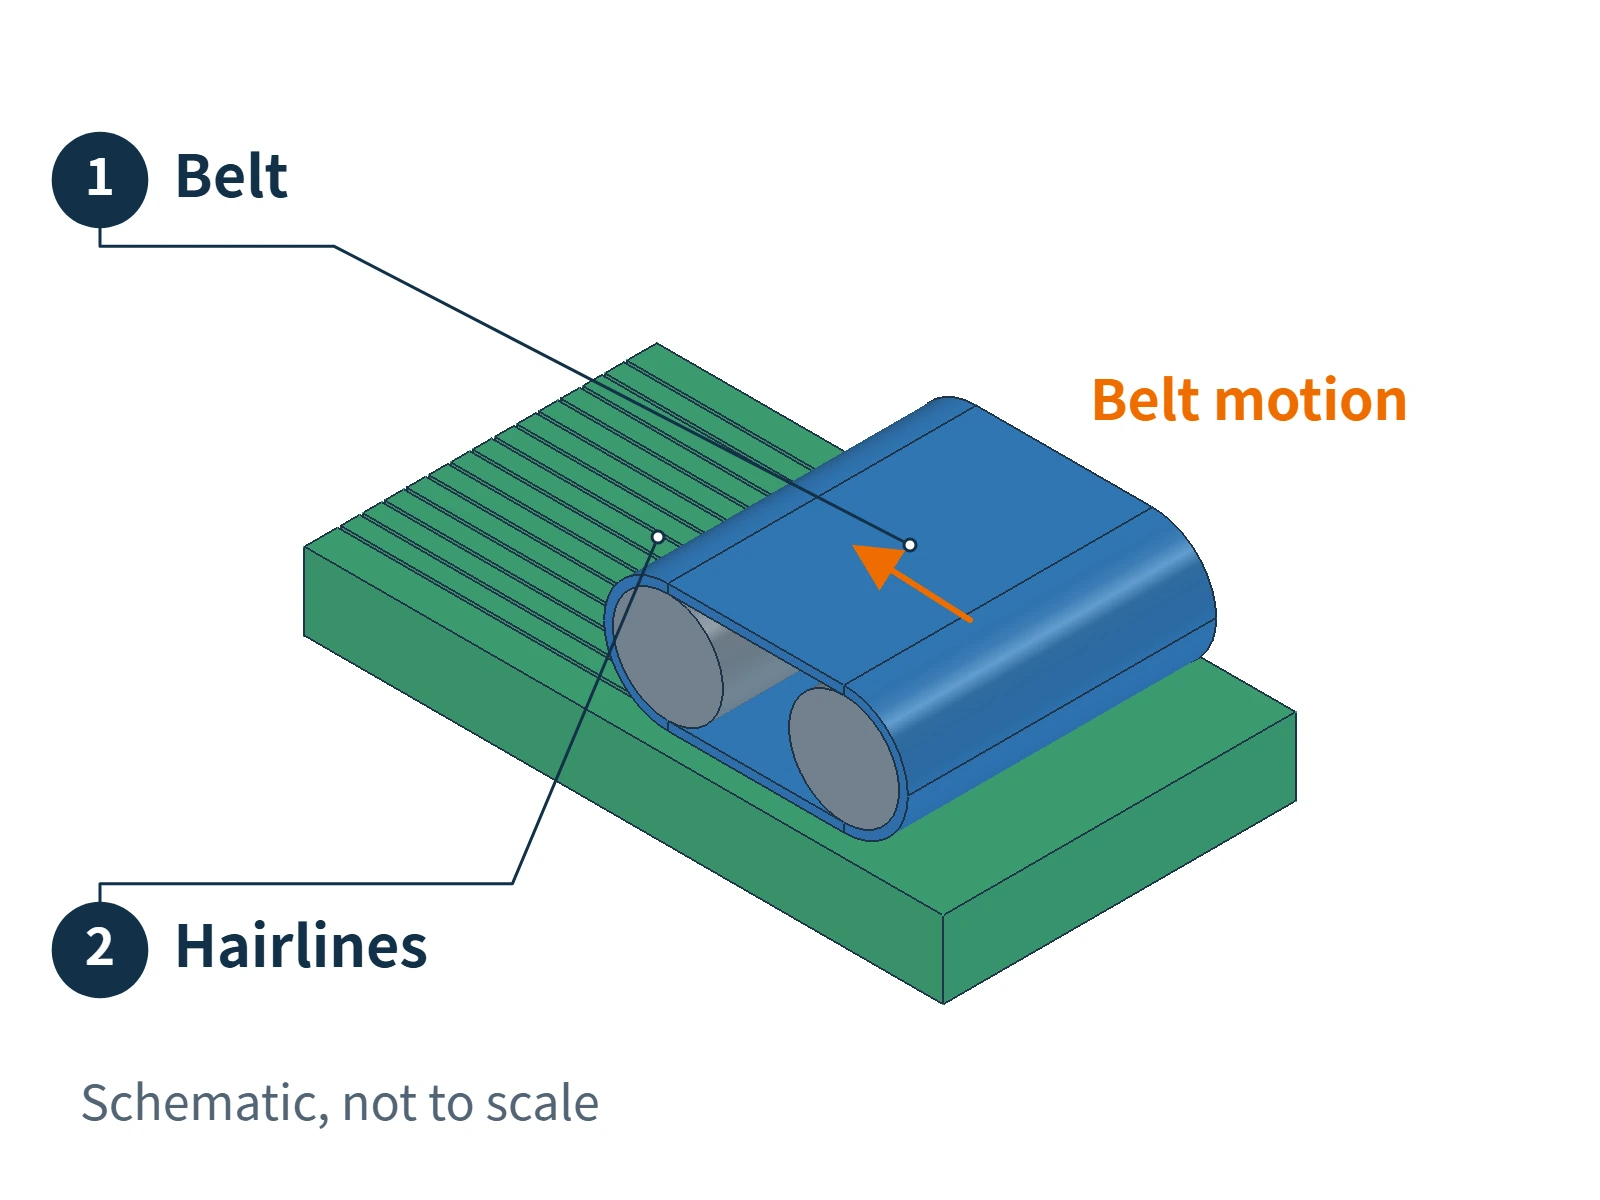
This differs from deeper decorative grooves. Brushing mainly changes the fine surface topography, emphasizing the direction and continuity of the lines. Turned ring grooves and knurled patterns place more emphasis on regular grooves, raised features, and profiles.
The tool must be able to reach the area to be brushed and maintain the required direction of travel. If one area needs hairlines while the adjacent area must remain smooth, localized processing or another texturing method is needed. The cast-in simulated brushed texture discussed earlier is another way to obtain directional lines.
Abrasive and Bead Blasting: Creating a Uniform Matte Surface
Abrasive blasting and bead blasting use particles striking the surface to create fine irregularities and a matte or granular texture. Technical guidance on finishing die castings lists blasting with fine abrasives as an available process.
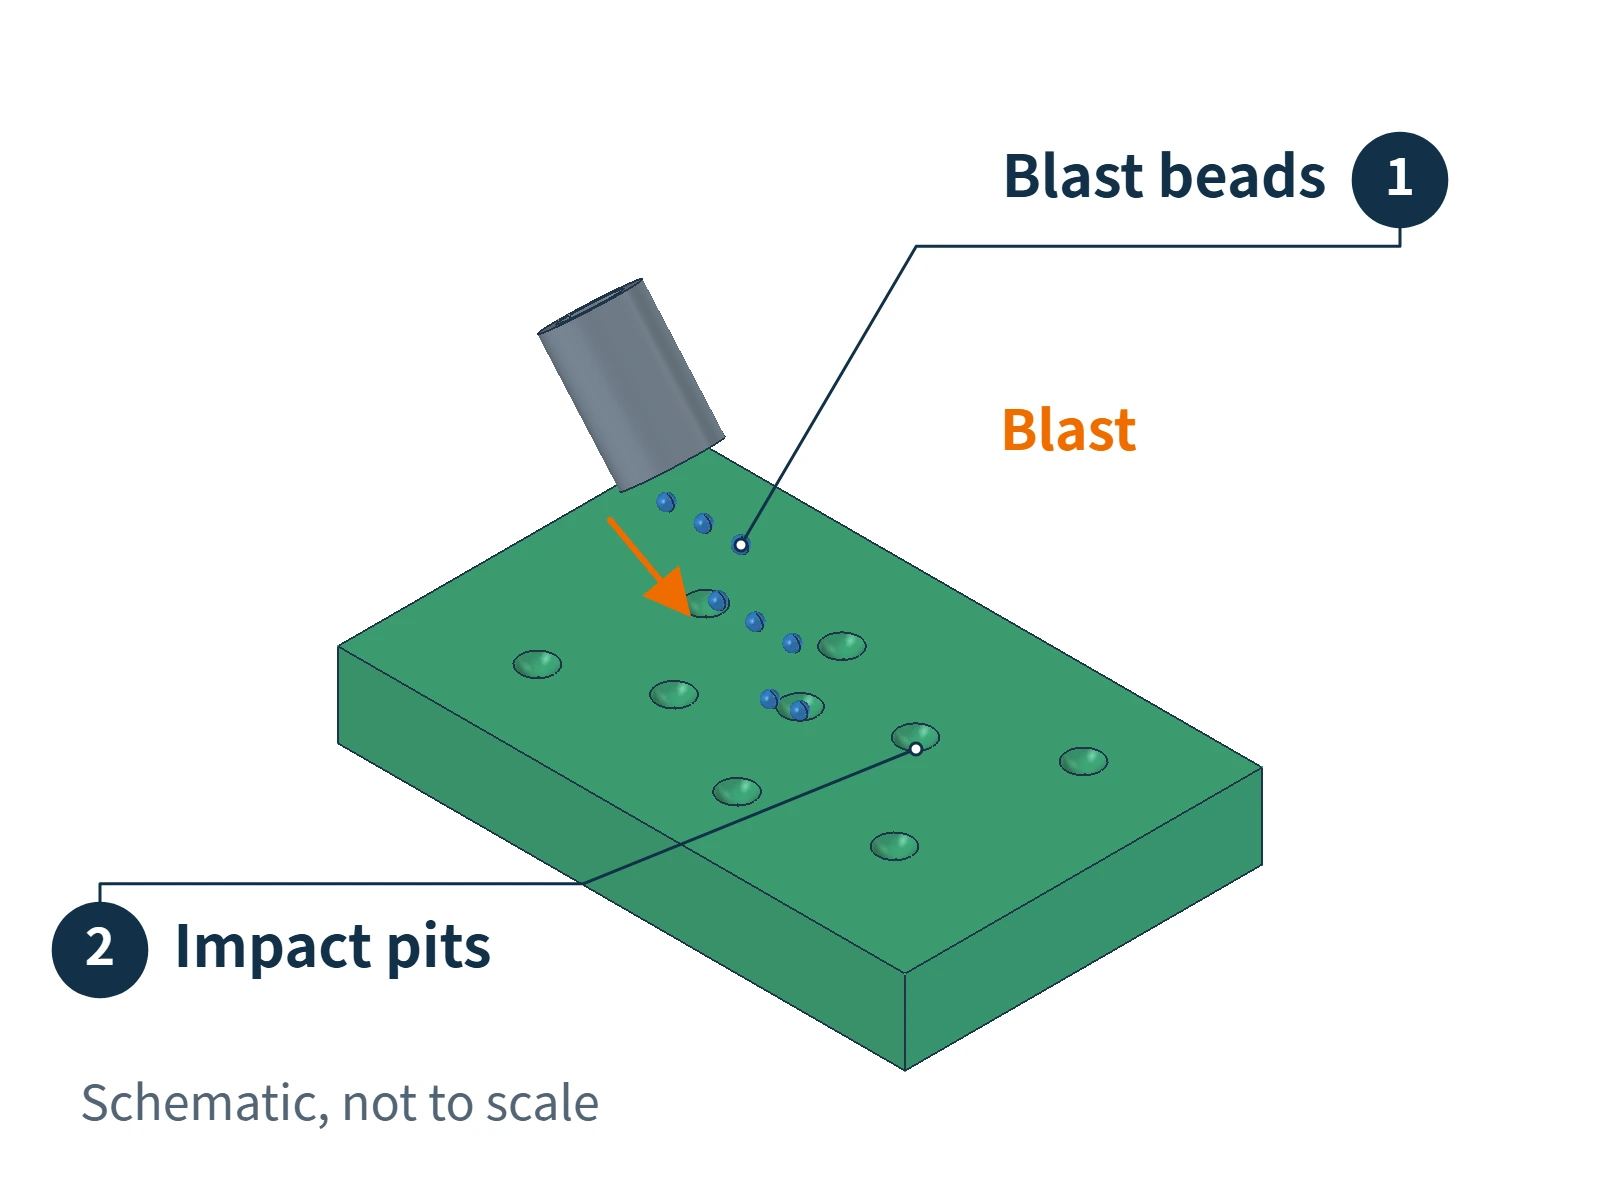
Bead blasting can use glass beads, while abrasive blasting can use media such as corundum. Particle shape, size, and blasting conditions change the result. Unlike brushing, these processes generally do not emphasize fine lines in a single direction; instead, they create a relatively uniform texture across an area.
These treatments can produce an overall matte finish or localized matte areas, which serve a different purpose from cutting a clearly defined decorative groove. If the same cap needs both glossy and matte areas, masking or processing separate areas is required. The contrast should still be checked on a sample that has completed all surface-finishing operations.
Polishing and Electroplating Can Change the Texture
After texturing, a perfume cap may undergo further polishing, coating, or electroplating. These operations change gloss and color, and some also affect the definition of fine textures.
Polishing removes and smooths surface material, so small raised features and shallow textures need care to preserve them. Electroplated deposits with a leveling effect can also reduce fine detail. Technical guidance on acid copper electroplating explains that its leveling action can fill fine scratches. To retain brushed hairlines or shallow engraving, it is therefore insufficient to examine only the bare part immediately after texturing.
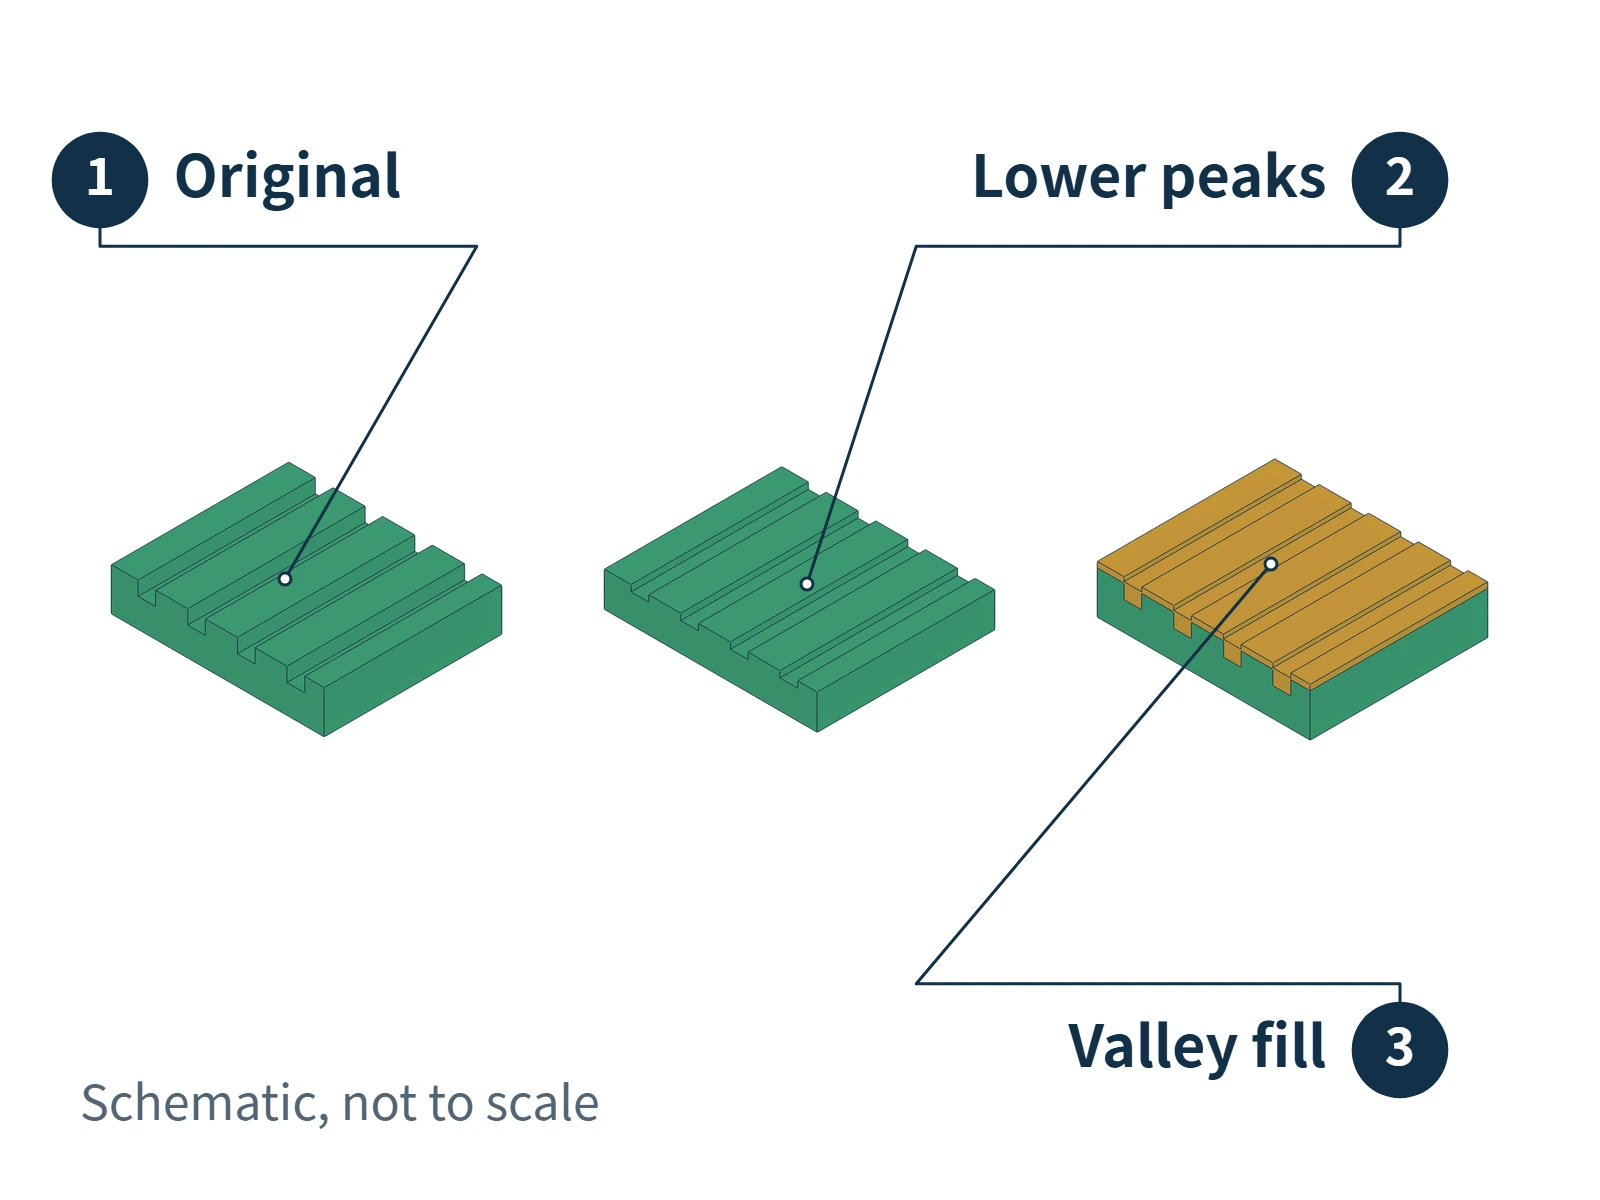
A single cap can combine several processes: large patterns form during casting, local grooves are cut afterward, brushing or blasting adjusts surface texture, and subsequent coatings or electroplating provide color and gloss. If a laser removes a coating to create a contrasting graphic, that surface layer must be present first. For engraving into the metal, subsequent protection and coloring need to be validated as part of the full process.
When designing a texture, first specify the relief, lines, or granular effect you want, then confirm which operation creates it. When evaluating samples, examine the texture after all surface-finishing operations, rather than looking only at the cast blank. This connects the pattern, the processing method, and the finished appearance.